
Installation and Setup
To install Grooveliner on Windows, execute the "Grooveliner_x.x.x.msi" file and follow the provided instructions.
To install Grooveliner on Mac, execute "Grooverliner_x.x.x.pkg" in the "Grooverliner_x.x.x.dmg" and follow the provided instructions.
Loading Plugin in the DAW
Grooveliner is a MIDI effect plugin. In Logic, you can insert it into a MIDI fx slot. In most other DAWs, the typical approach is to load it as an instrument plugin for a track, and in the other track(s), set the MIDI input source to that track. In some DAWs, like Studio One, you can also run Grooveliner as an independent instrument without associating it with a track but use it as a MIDI input source for one or more tracks.
Sending MIDI data to Multi-tracks in Logic from one Grooveliner instance
In Logic, if you want to output MIDI data to multiple tracks from one Grooveliner instance by setting different output channel, you may need to use following workaround.
- Create an IAC (Inter-Application Communication) port through Mac's Audio and MIDI settings. For more details, please search online.
- Create a dedicated track for Grooveliner. Assign Grooveliner as the MIDI FX plugin and select the IAC device in the "External Instrument" instrument settings.
- Create a track with your desired instrument and set the MIDI channel to your preferred one.
- Go to Settings > Recording > Project Settings and check "Auto demix by channel if multitrack recording." (Note: Starting from version 7.0.4, this checkbox has been removed, so this step is no longer necessary.)
- Enable the [R] (Record) button for the target tracks, and you will hear the sound for each channel.
Activation
You will see an activation window the first time you load the plugin. You can try a 30-day free trial by clicking the "Trial" button. If you decide to buy this plugin, enter your Serial number in the designated box and press the "Activate" button. Internet access is required to use this plugin, as it checks the license availability upon activation.

Definition of "Beat" in Grooveliner
In Grooveliner, as used conventionally in most DAWs, 1 beat corresponds to a quarter note, regardless of the DAW's configured time indicators. The same applies to the BPM (Beats Per Minute).
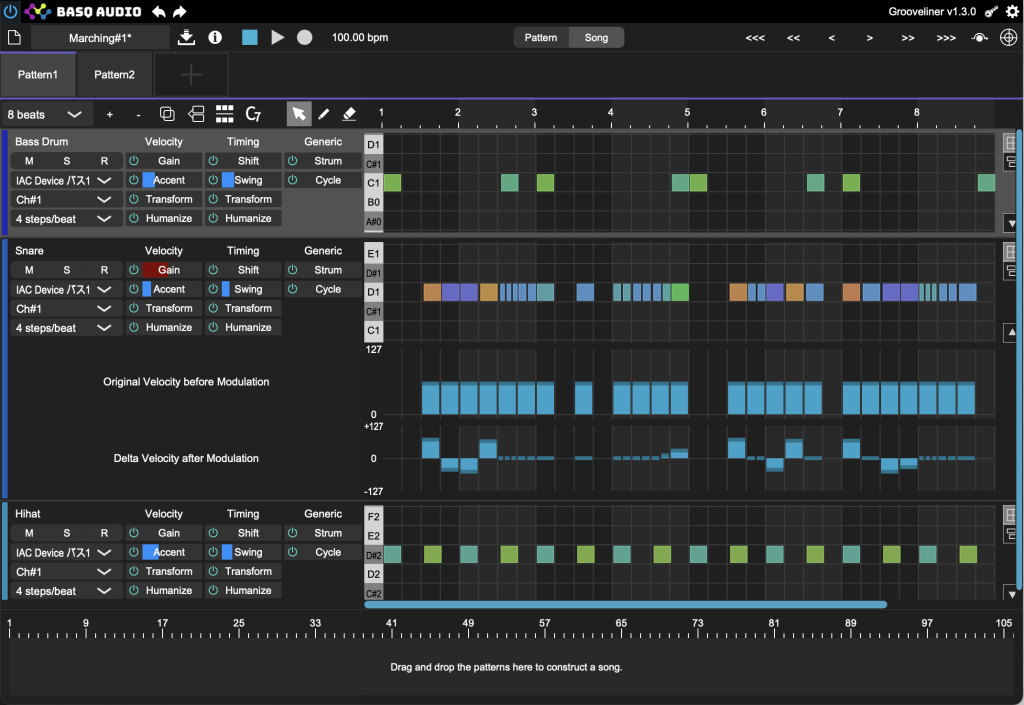
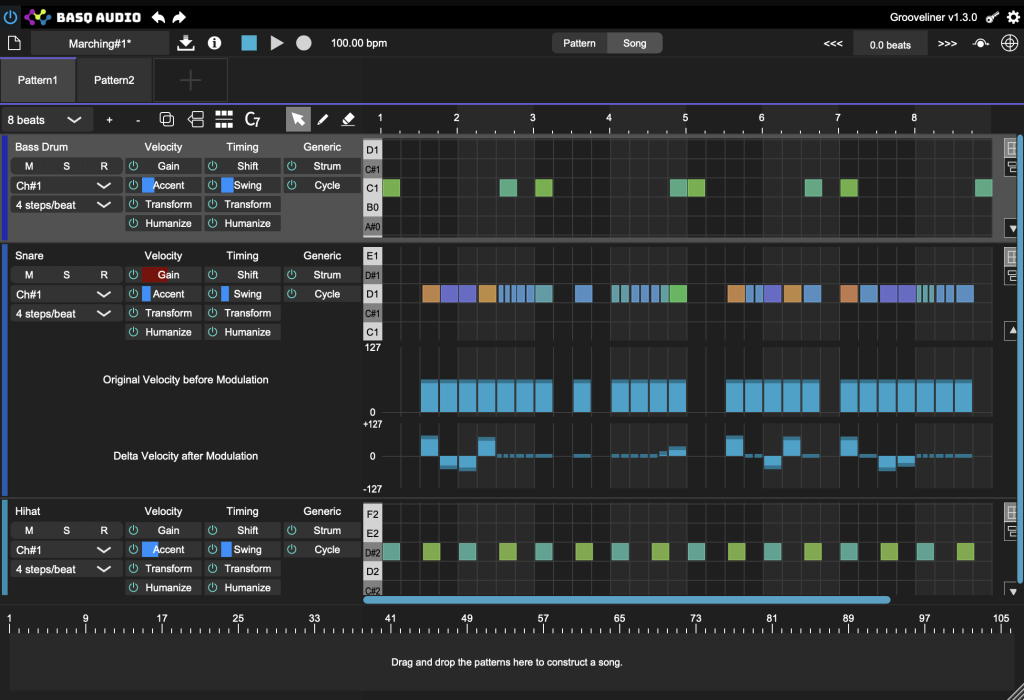
GUIs
The plugin version and standalone version have slightly different GUIs.
Standalone :
Plugin
(1) Bypass swtich. When it is bypassed, no MIDI message is output.
(2) Show activation dialog.
(3) (Standalone app only) General Configuration. Your can configure the MIDI input device to be used for recording.
(4) Make a new sequence. Current sequence will be discarded.
(5) Show file loading/saving dialog.
(6) Length of the sequene. If longer sequence is selected, then the existing seuqnces is repeatedly copied. If shorter length is selected, then the last part of the sequnce is truncated.
(7) Add a track
(8) Remove selected track(s)
(9) Duplicate selected track(s)
(10) Separate selected tracks into two tracks . Only the selected notes are moved to new track while all other conifgurations are cloned.
(11) Stop/Play/Rec Button. In the plugin version, Play/Stop status will be synchronized with DAW.
(12) BPM configuration. In the plugin version, once the DAW is playbaked then the BPM is automatically overwirtten by DAW's BPM.
(13) (Standalone only) Overall time adjustment. From left to right : 1 beat forward, 10msec forward, 1msec forward, 1 msec backward, 10msec backward and 1 beat backward. This is useful for e.g. when you try to sync timing with the external audio plays and try to make rhythm patterns for it.
(14) (Plugin only) Condigure the time offset between DAW and plugin. With 0 beat offset, the measure #1 in grooveliner corresponds to the DAW's measure #1. If you want to shift that mapping, change these values. For e.g. in the 4/4 time sigunare, making this value to "+ 4 beats" means measure #1 in Grooveliner corresponds to measure #2 in DAW.
(15) MIDI drag and drop region. You can drag and drop the MIDI data of selected tracks from here.
(15) Track name. Conigurable by double click.
(16) Mute/Solo/Recording Button. To enable MIDI recording, enable "R" for the target track(s) and, push Rec button in the upper bar.
(17) Grid configuration for this track. Number of divisions of a beat. When number of division is changed while some notes exists in the track, those notes are re-placed to the nearest grid of a new division configuration. Please not that when the number of division is reduced, then some notes will be removed(i.e. multiple notes will be mapped to single grid) and is not recoverable.
(18) (Standalone only) MIDI output device selection. In the plugin version, no concept of MIDI output device.
(19) MIDI output channel selection. This can be conigured even in the plugin version. In some DAWs, then you can use multiple soud source by single pluging instance by allocating the differerent channel for tracks.
(20) Timing and Velocity modifiers sections. Please see the modifier chapter for details.
(21) Piano roll view.
(22) Switching Step View Mode / Piano Roll View Mode. In the step view mode, all the notes are shown with the duration of single step. Actual, duration is not reflected. Good for percussion / drum tracks. In the piano roll view, duration is also shown and you can change the duration of the note. Good for normal instrument tracks.
(24) Addtional view to conigure the velocity of the note (relative delta after appying modifier). Press 'a' key while selecting the track to show/hide this view.
Modifiers
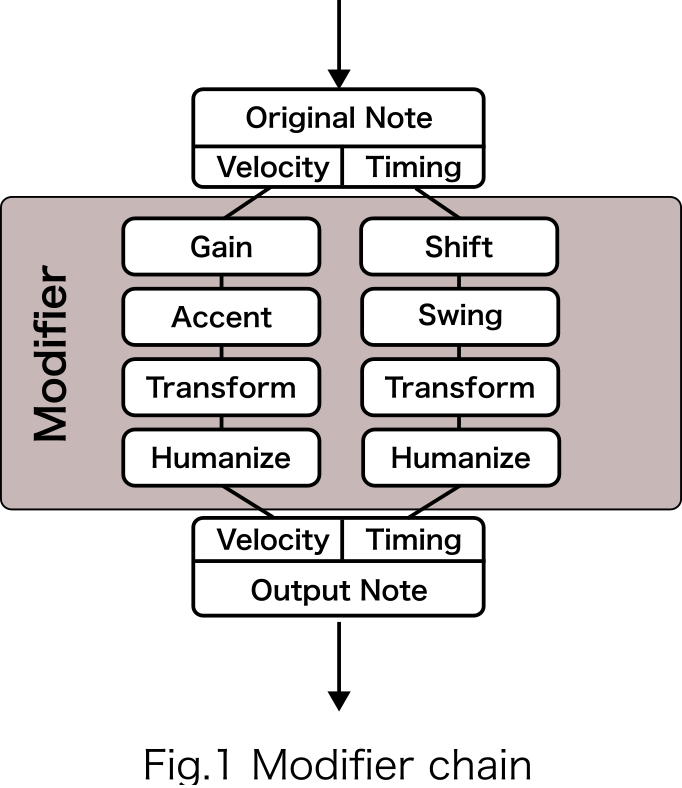
The concept of MIDI note modifier is a key feature of Grooveliner. It allows you to apply modifications to MIDI timing and velocities using various algorithms. The modifier chain is depicted in the figure on the right.
As of version 1.x.x, all the modifiers are independent of each other in principle, and the order of applying them does not have a significant impact. However, in the case of velocity modifier, where the absolute velocity ranges from 0 to 127, the order can sometimes have an impact if the velocity reaches 0 or 127 in the middle of the modifier chain.
Velocity Modifiers
1) Gain : New Velocity = Original Velocity * (1 + Intensity). Intensity = -100%(-1.0) leads to all the notes are 0 velocity. Intensity +100%(+1.0) leads to the all the original velocity becomes double.
2) Accent : This make a velocity difference for the notes as per the interval and offset given.
If (Step Index - Offset) mod interval = 0, New Velocity = Original Velocity * (1 + Intensity)
Otherwise, New Velocity = Original Velocity * (1 - Intensity)
Also, there are two set of interval and offset. Final output velocity is the weighted average of each branch.
New Velocity = Mix Ratio * New Velocity_1 + (1 - Mix Ratio) * New Velocity_2
3) Transform : New Velocity = Original Velocity * ( 1 + function (Step Index - Offset) * Intensity )
6 functions shown in Fig.2 can be selected.
4) Humanize : New Velocity = Original Velocity * ( 1 + Uniform Random Value * Intensity )
Timing Modifiers
1) Shift : Delta Shift = 16th Note * Intensity. Maximum shift is 16th Note regardless of the division configuration.
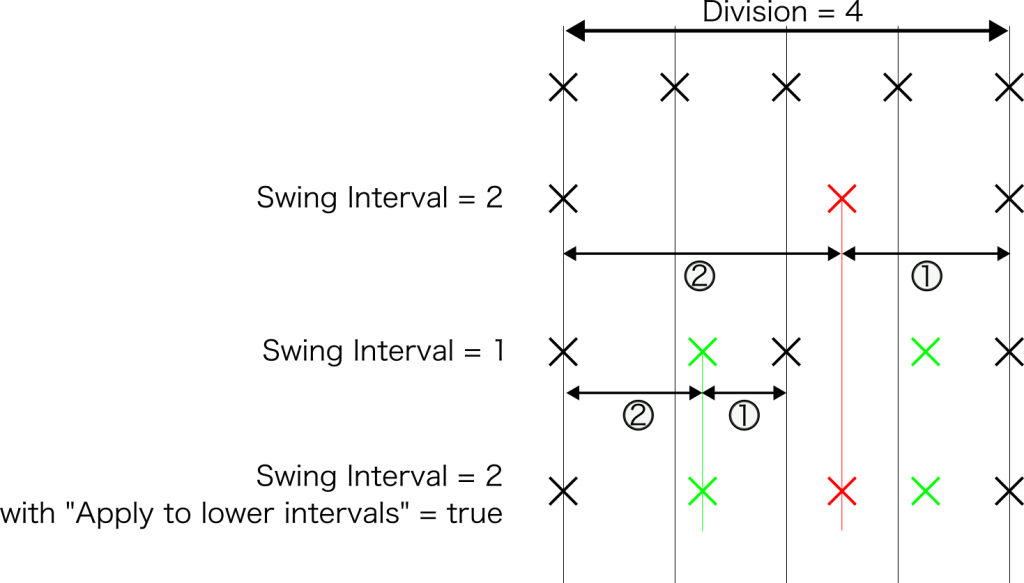
2) Swing : If (Step Index - Inteval) mod (interval * 2) = 0, then Delta Shift[step] = Interval[step] * 1/3 * Intensity.
For instance, with number of division = 4 (1 step = 16th note) and 2 step inverval, notes at step #2, #6, #10, ... are moved. When a swing intensity is set to 100%, it results in a swing 8th. When number of division = 4 and 1 step interval, it leads to swing 16th when intensity is 100%.
If the "Apply to lower intervals" checkbox is enabled, then the swing is applied for sub intervals as well. For instance, with division = 4 and 2 step interval, then the swing for division=4 and 1 step interval(swing 16th) also applies.
3) Transform : Delta Shift = function ( Step Index - Offset ) * 16th Note * Intensity. 6 functions as shown Fig.2 can be used. Maximum shift is 16th Note relgardless of the division configuration.
Generic Modifiers
1) Strumming :
Direction : Stroke direction. Down is imitate the stroke from upper notes to down notes. Up is the opposite. Alternate is switch down and up once the note(>= 2 notes in one step) is found. 1 step alternate is to forcibly switch stoke direction (down or up) for every steps regardless of the notes exist or not.
Timing Slope : Intensity for timing amount of stroke, which in other words is "speed" of the stroke.
Velocity Slope : Slope for the velocities of the notes in single step.
Preserve Note End : Do not change the end time of the note , i.e. only the start time of the notes are change.
2) Cycle : User can modify the velocity, timing and duration of the each step respectively.
Target step = step number mod periodicity
Velocity : New Velocity = Original Velocity * (1 + Intensity)
Timing : Delta Shift = 16th Note * Intensity
Duration: New Duration = Original Duration * (1 + Intensity)
3) Gate : Note is disabled with specified probability.
Seed: A random seed used to generate pseudorandom numbers, which determine whether each note is disabled based on the set probability.
Note Independent: If checked, note validity is evaluated for each note in the track. If unchecked, note validity is evaluated for each step.
Import MIDI file
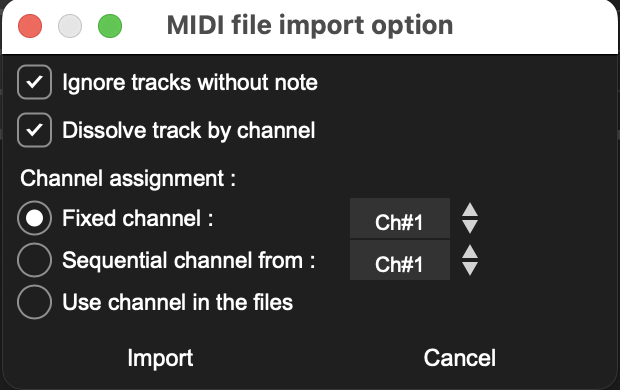
User can import MIDI file (type 0/type 1) from import button in the upper bar or by drag and drop.
Ignore tracks without node : Ignore tracks that does not contain any MIDI note ON or OFF message. This prevents to make a empty track which is normally made by the exporter tool(like other DAW) to specify meta informations such as tempo, key, etc.
Dissolve track by channel : When more than one channels exist within one track, which normally happens in Format 0, separate the imported track by the channel.
Fixed channel : Set the channels of imported tracks to specified channel.
Sequencial channel from : Assign the channel sequentially from the specified channel ( e.g. when 3 tracks are imported and start channel is ch#15 -> channel 15, 16, 1 are assigned for each track. Restart from ch 1 after ch 16. )
Use channel in the files : Use the specified channel in the source MIDI file. Some exceptions : Multiple channel is mixed in a single track and dissolve track by channel is OFF, then just use the channel of the first note found in the MIDI file.